Admin

Creating a Report Template

June 5, 2026
NOTE
Report templates can only be created on the PC Dashboard by Administrators and Leaders designated as Report Box Managers.

1. Creating a Report Template

  1. Go to Dashboard > [Report].
  2. Select the Report Box where you want to create a new template.
  3. Click [Add Template].

2. Entering Template Information

General Settings

Basic Information

Template name (Required)

Enter the name of the template.

  • You can enter up to 50 characters, and you cannot use the same name as another template in the same report box.

‍

Writing ghuide (Optional)

‍Enter guide text for members to refer to when writing the report.

  • Up to 500 characters can be entered.
  • You can enter the guide as you want using the editing tools.

‍

Creation Rules

Report creation basis

‍You can set whether the report should be written by employee or by workplace.

  • By member: When each employee must write their own report.
  • By workplace: When writing a report for each workplace.

‍

Created by

‍You can set which members will write the report using this template.

You can set it so that only a specific group or specific employee can write it.

‍

Required submission date

‍If it is a report that must be written repeatedly at specific intervals, try setting a mandatory creation date.

  • When a mandatory creation date is specified, it is exposed on the [Today's Work] screen of the employee set as the writer.
  • If there is a report not written on the day when clocking out, a warning message can be displayed to encourage writing.

‍

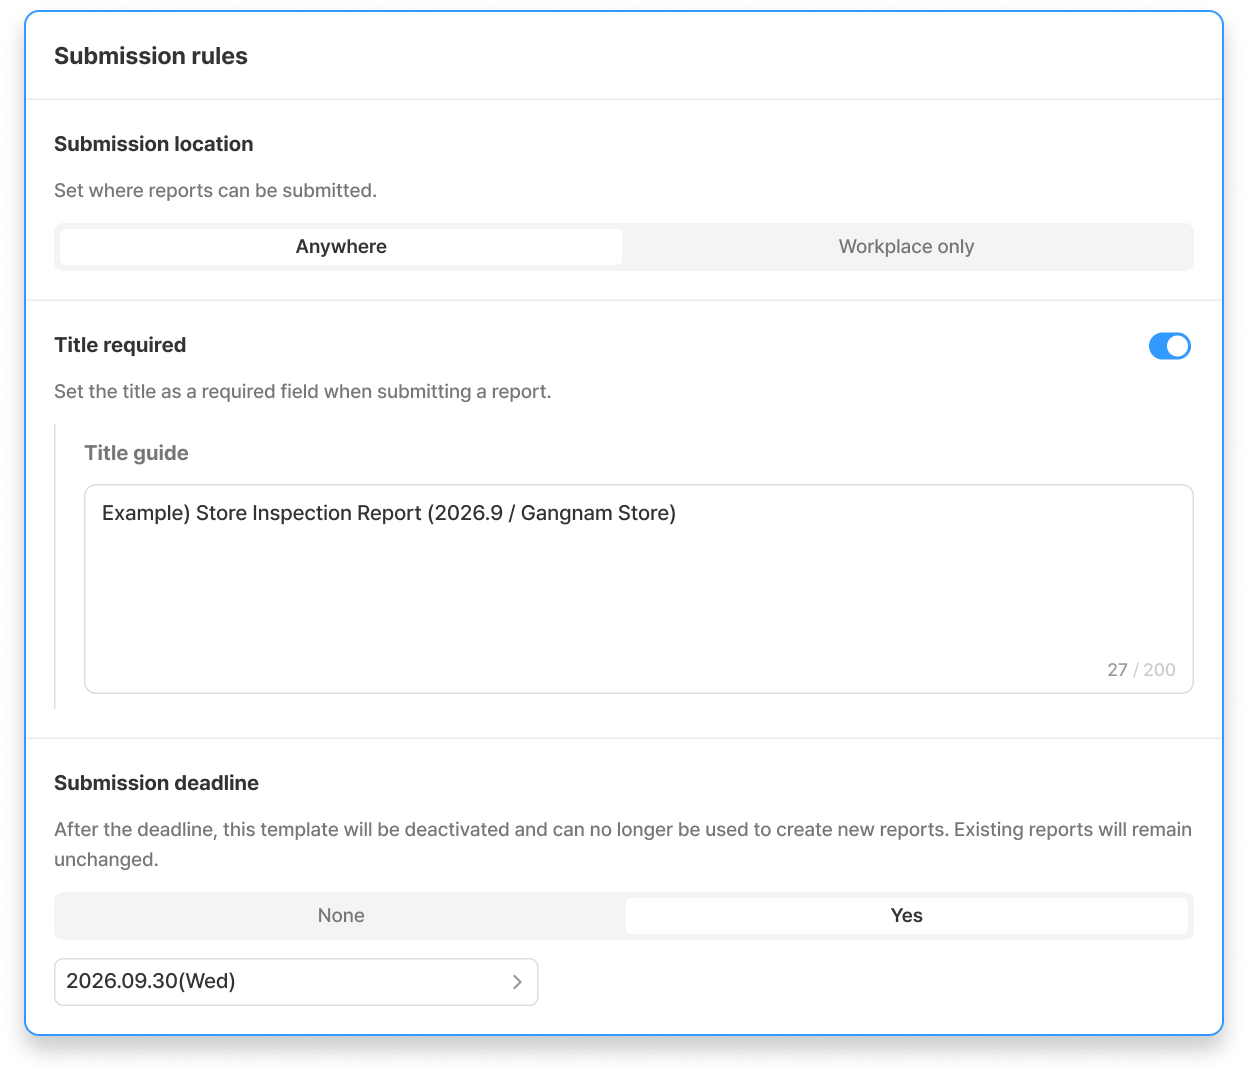
Submission Rules

Submission location

‍Try setting the location where the report can be written.

  • Anywhere: You can submit the report anywhere regardless of the assigned workplace.
  • Only at the workplace: You can submit the report only at a registered workplace.

‍

Title required

‍Try setting the title to be required when writing a report.

‍

Submission deadline

‍If the submission deadline passes, the template is automatically deactivated, and reports can no longer be written.

  • Previously written reports do not disappear.

‍

Recipient Designation

‍

Fixed recipients

‍You can set the target who can check the written reports.

  • Fixed recipients can also add, edit, and delete the status of the report.

‍

Report submission notifications / Notification recipients

‍You can set whether to send a notification every time a report is submitted and who will receive the notification.

App push notifications are provided by default, and email notifications can be additionally set.

  • Members designated as notification recipients are automatically included as fixed recipients.

‍

Additional Settings

You can set statuses, colors, and icons related to the report.

‍

Form Items

Categorize form items through sections, and enter the item type, title, and description.

  • Section: Enter a section name and description to categorize form items.
  • Title: Enter the title and description of the item, and if necessary, you can attach photos and documents together.

You can set whether it is a mandatory question to answer, and you can change the order of questions by drag and drop, or copy and add questions.

Item types

  • Single Text: Write an answer to the question.
  • Multi Text: Write answers for multiple questions.
  • Grid Text: Write an answer in a table format.
  • Barcode: Scan a barcode or enter the barcode number directly.
  • Multiple Choice (Single Selection): Select one (single) of the options.
  • Checkbox: Select one or more (multiple) of the options.
  • Member: Select one or multiple members depending on the multiple selection permission setting.
  • Workplace: Select one or multiple workplaces depending on the multiple selection permission setting.
  • Distributor: Select one or multiple distributors depending on the multiple selection permission setting.
  • Brand: Select one or multiple brands depending on the multiple selection permission setting.
  • Checklist (Yes/No): Check Yes/No for the question.
    • You can set whether to attach a photo and enter an answer according to the response.
  • Signature: The writer signs directly.
  • Date/Period: Select a date or period.
  • Time/Time Zone: Select a time or time zone.
  • Photo: Take a photo directly or attach it from the gallery. (Up to 10 allowed)
  • Video: Attach a video from the gallery. (Up to 4 allowed)
  • Document: Upload a document. (Up to 10 allowed)

‍

Convenience Features

Save draft

‍You can enter the template content in advance, save it temporarily, and activate it for later use.

‍

Bring existing template

‍You can import the settings and form items of an existing template, modify them, and use them.

If the template you need to create newly is similar to the previous template, try easily creating a template through the Bring existing template feature.

‍

Preview

‍Before adding a template, you can preview the screen that members will see when writing a report.

‍

1:1 Chat
Click floating chat icon for 1:1 chat support.
Zoom Support
Select available time here.
Email
If you have specific inquiries, contact us at support@shoplworks.com.