Employee

Add Display Status Data

02-12-2025
NOTE
Display status data can be added by employees through the APP or by Admins through the dashboard.
Data uploaded through either route is reflected to the other in real time.

The display status tab in the app is available in both employee mode and Yes mode.

1. App > Add display status data (Employee)

Reference: The dates on which employees can upload data are set by Admins. (e.g., Upload today's data only / Upload data from up to the most Recent xx days including today)
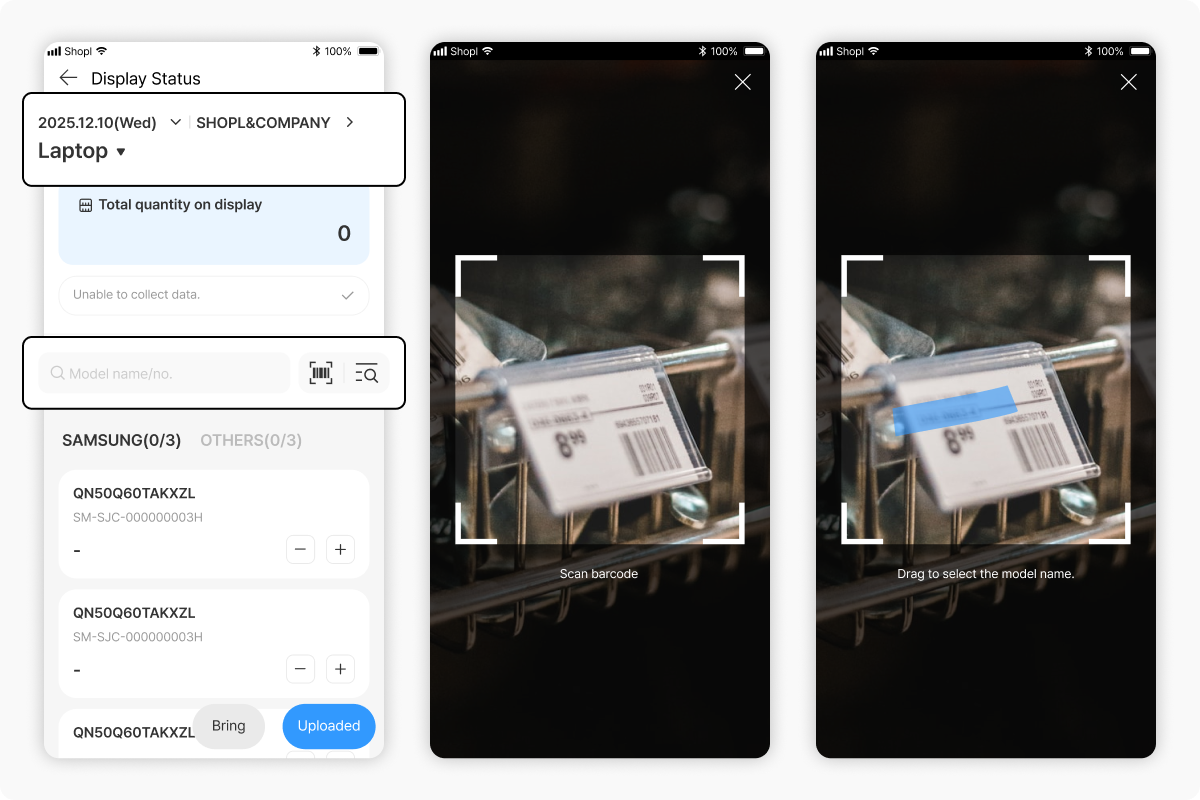
Uploading display status data

1. Menu or Today's Task > Display Status > Select the collection Date and collection workplace at the top.

2. Select the Product category for which you want to Registered Display status data.

❗Only product categories for which the user is Planned as an Employee who collected are shown. Please check with your Company Admin to confirm whether you have been Planned as an Employee who collected.

NOTE
🤔Have you been Planned to collect Display status data through Today's Task, but are unable to collect because the Store does not carry any of the models?

Check the "Unable to collect data." button. This will mark the task as Completed.

3. You can Search by Model name/no. or scroll down to find a model directly.

  • Model name/no. Search
  • You can Search directly by entering the Model name/no. as Text.
  • You can quickly enter a search term by scanning a Barcode.
  • You can quickly enter a search term by dragging the model name in a Photo using OCR scan.

4. Enter the collected display quantity for each Brand – model.

  • The method for entering the Display quantity varies depending on the Settings of the selected Product category.
  • If you only need to enter the total Display quantity for the Store:
    • Click the +, - Icon for the model you want to enter Display status for to adjust the Quantity, or enter a number directly, then press the [Upload] button at the bottom to Upload.
    • The Display quantity for all models with entered data is uploaded in bulk.
    • Pressing the Bring Icon lets you retrieve the most Recent Display status data uploaded for that workplace.
  • If you need to enter the Display quantity by Store Location or attach a Supporting photo:
    • Click the + Icon for the model you want to enter the Display quantity for to Move to the Display quantity Details page.
    • Click the +, - Icon in the Display quantity field to adjust the Quantity, or enter a number directly.
    • When collecting Display quantity by Store Location, adjust or enter the Quantity per Location. The total Display quantity for the Store is calculated as the Total of those quantities.
    • If a Supporting photo attachment is Required, you can attach one. When collecting Display quantity by Store Location, a Supporting photo must be attached for each Location.
    • After entering all Required data, press the [Upload] button at the bottom to Upload the Sales data for that model.

Deleting and editing uploaded display status data

1. Menu or Today's Task > Display Status > Select the collection Date and collection workplace at the top.

2. Select the Product category of the Display status data you want to Delete or Edit.

3. If you want to Edit entered Display status data: Activate "Show only displayed models" to Sort and display only models for which Display status data has been uploaded. Directly Edit the Display status data that needs to be modified in that List, or Move to the Display status Details page, Edit the data, and then press [Upload].

4. If you want to Delete entered Display status data: Go to the model name tab > click the trash can Icon at the bottom right, or Move to the Display status Details page and click the 'Delete' button to Delete the entered Display status data.

2. Dashboard > Add display status data (Admin)

Adding display status data individually

In addition to data collected by employees, Admins can also Add Display status data directly.

1. Dashboard > Display Status > Collected data > Click 'Add data' in the top right

2. Click the model name field.

❗A model must be Added to the List of models before data can be Added!

3. Please select the Date / Store / Employee who collected.

4. Please enter the Display quantity. If the Product category requires collecting Display quantity by Store Location, enter the Display quantity for the applicable Location.

5. If Required, attach a Supporting photo. When collecting Display quantity by Store Location, a Supporting photo must be attached for each Location.

6. Please press Save.

Bulk adding display status data

When an Admin adds Sales data directly, it can be added in bulk via an EXCEL file.

1. Dashboard > Display Status > Collected data > Click 'Bulk add display status data' in the top right

2. Select the Product category to Add data for > Click Download sample

3. Open the downloaded EXCEL file and enter data in bulk for the selected Product category

Notes when entering data in the EXCEL file
・ Items marked with * are Required. (However, 'Model no.' may be omitted if there is no value)
・ Dates must be entered in YYYY.MM.DD format. (Example: 20241212 – Entering in a different format will make Normal Upload Impossible)
・ When entering Employee info for the Employee who collected, if there are employees with the same name, you must additionally enter the Employee ID or Phone no. to Sort them.

4. Dashboard > Bulk add display status data > Search > Attach the completed EXCEL file.

5. After pressing Apply, review and Edit the information to be Registered in the Preview screen below.

6. Directly click on any Error lines shown in red to Edit them.

7. Select the data you want to finally Upload, then press Save.

1:1 Chat
Click floating chat icon for 1:1 chat support.
Zoom Support
Select available time here.
Email
If you have specific inquiries, contact us at support@shoplworks.com.